Saturday, December 31, 2011

GET AHEAD FOR CHRISTMAS 2012!!!!!!!!


I'm afraid that I'm going to use the "R" word - I know I won't be popular, but it's for your own good!!!  Most of us make resolutions (there I've said it!!) about being more organised - and I'm giving you an easy way to get the warm fuzzy feeling - prepare the fruit for next year's Christmas cake this week, imagine how organised and "Suzie Homemakerish" you'll feel - so what if you don't keep to the healthy eating regime or if you don't manage to hit the gym every day - you still know that your Christmas cake is getting more delicious by the day!

Why am I so evangelical about this year long soak for the fruits -  once again I managed to forget about the fruit that I had left to soak for a whole year (my last find was a jar of raisins that had been soaking in dark rum for a very, very long time - scrumptious)  - and I have to say that the result was the richest moistest cake ever (well equal place with Nigella's chocolate Christmas cake).

I urge you to pop over to The Pink Whisk's recipe for boozy fruit for your Christmas Cake where you will find the directions for this cake elixir.  It makes so much sense to prepare the fruits at this time - you probably have many of the fruits and the booze in the cupboard, what better way could you have to use them up?


 I want to thank you all for your support during 2011 and to wish you the very best for 2012.

Friday, December 23, 2011

CHOCOLATE REALLY DOES WORK IN THIS CHRISTMAS CAKE!


How long does it take to make a tradition?  Some Christmas traditions come to us through our parents and grandparents, some probably from the idealised versions we see on T.V. (do families really decorate the tree together while humming carols and sipping hot chocolate - or is the general experience more like mine, where I whine about doing it, hint for help but get told that I'm the "artistic one"!!!!!!  Baah Humbug) but what about the traditions we make ourselves?  I reckon that Nigella's Chocolate Christmas Cake is fast becoming a tradition here in Brownieville - Christmas wouldn't be quite the same without it sitting under the dome on the cake stand.  Regular Christmas visitors have been known to ask for it (they don't know about the puddings!!!!!!).


It is really easy to throw together, being what my mother would call a boiled cake - most of the ingredients are heated together in a pot (which means there is no need to soak the fruit) then you add a few more and bake.  I will admit that there is all the faffing about having to line the tin, but other that that is's "wham bam thank you mam"

The cake has a beautifully moist texture, the chocolate and orange flavours are subtle and actually add to the Christmassyness (!) of the cake.  It should be eaten within 2 weeks (no problem I promise!!) so is prefect for the last minute merchants amongst us!!  Please don't worry about all the prunes in there, nobody will notice, and think of all the good it will be doing to their tummies after the Christmas stodge!!

When I saw that Choclette has challenged us to include orange to a chocolate bake for this month's We Should Cocoa, it was a shoe in for this cake!


Chocolate Christmas Cake
adapted from Nigella Lawson's recipe                                      
350g            stoned prunes, chopped
250g            raising
175g            currants
175g            butter
175g            dark sugar
225g            honey
75ml            coffee liqueur
50ml            hazelnut liqueur
1                 orange, juiced and zested
3                 mandarin orange, juiced and zested (if large just use 2)
1 tsp            mixed spice
2 tbsp          cocoa powder (sifted)
3                  eggs, beaten
150g            flour
75g              ground hazelnuts (or almonds)
1/2 tsp         baking powder
1/2 tsp         bread (bicarbonate of) soda


Double line and butter a 20cm x 9cm deep round cake tin.  When filled I also tie a couple of layers of newspapers around the outside - belt and braces!! 

Put the flour, ground nuts, baking powder and bread (bicarbonate of) soda in a bowl and set aside.
Put the remaining ingredients (except the eggs) in a large saucepan and gently bring to boiling point, stirring regularly.
Allow to simmer for 10 minutes and set aside for 30 (or longer if it's handier)
While it's cooling I prepare the tin.
Add the beaten egg and the dry ingredients, combine well.
Pour into the prepared cake tin and bake for approx 2 hours.
You want a texture less gooey than a  brownie but more so than a normal cake.
Put the cake tin on a wire rack and allow to cool.
Eat immediately if you wish, but it will keep for about 2 weeks, depending on your will power!!!


Saturday, December 10, 2011

ANYONE HAVE A CURE FOR "TOOMUCHTODOITIS"?


I have been missing in action - sorry guys, I'm suffering from a very bad case of "waywaywaytoomuchtodoitis" which along with a chest infection has kinda floored me.  Luckily I managed to make the Christmas puddings before the malaise hit!

I have mentioned the importance of Christmas Puddings in Brownieville on a previous post - every year I make an obscene number (getting larger each year), every year I plan to pass on a couple as presents, and every year a certain person manages to demolish the lot (you are soooo mean - it's NOT me!!!).

Brownieville Man (for it is he!!) is probably the most generous person I know, he is always up first to pay the bill when we go to restaurants with friends, ditto when we go out for drinks (although we don't do that very often any more - old age?) BUT when it comes to my Christmas Puddings, he is just short of weighing them before he heads out, in case I offer some to visitors during the day!!!!!!  It is the truest demonstration of his abiding love for his sons that he allows them (almost)  free access to the pudding tin!!!

This pudding recipe comes from my paternal grandmother, via my mother, with many changes en route.  It is very, very easy - all it needs is time steaming away, and if you have a good sized steamer that holds plenty of water, you can just leave it without a thought!  Actually the shopping is the hardest part - just make sure that you use good fruit and that you don't use the tub of prechopped candied peel - it does make a difference to cut it yourself.

By the way, our resident pudding expert says that all the stuff about puddings maturing is codswallop, and the fresher the better - just in case you have some time to throw this lot together.

Finally, on Christmas day, just reheat by steaming for a couple of hours (do NOT use the micro, my Mum learned that one to her cost!!) then pour some Vodka over and set alight - enjoy the "oohs and aaaghs" - you deserve them! (Vodka gives a longer burning time than Brandy).


It tastes unbeliveably good at this stage - use good eggs and
then pick to your hearts content!!!!


Granny's Christmas Pudding

1 lb            bread crumbs - preferably made from a stale batch (or any good) loaf
1 lb            sultanas
1 lb            raisins
1/2 lb         currants
1 lb            brown sugar
1/4 lb         freshly chopped mixed peel
1/4 lb         chopped glace cherries
1/2 lb         melted butter
1/2 lb         sifted plain flour
2 tbsp        mixed spice
2 tbsp        cinnamon
1/2             nutmeg - grated
5                eggs
200 ml       Guinness (more as needed)
100ml        Whiskey
100ml         Brandy

Combine all the dry ingredients in a very large bowl, and mix.
Add the eggs, butter and alcohol and mix well - get all family members to help.  They can stir clockwise 3 times and on each turn wish for "Health" then "Wealth" and finally "Happiness"
Cover with cling film (touching the mixture) and leave to absorb the flavours for at least 24 hours.
Spoon into your pudding basins - I just use plastic ones with lids, I put some greaseproof paper on top of the mixture and then pop on the lid.
Steam (in a steamer, or in a large pot with an upturned saucer in the bottom) for 7 hours.

This recipe makes one 3lb and one 2lb pudding.

I've made 10 puddings so far - I think that there are 6 left!! But this year I have one aside to give to a wonderful friend - and "himself" will help me wrap it (metaphorically that is!!!)


 I am entering my Pudding recipe for Vanessa's Let's Make Christmas Challenge (her book is at the top of my Christmas List!)

Tuesday, November 29, 2011

RANDOM NO CROUTON RECIPE


This month Dom and Jac * have teamed up to challenge us to pick a random veggie soup recipe and prepare it for your enjoyment (and ours of course!).  Dom has allowed us to choose our own method of randomising (?) our recipe, so I decided I would choose the first book to hand and cook the first soup recipe for which I had all the ingredients in stock.

I have been using Catherine Fulvio's Family Kitchen alot recently and her Roasted Yellow Pepper Soup and Tomato Soup looked delicious but there are pepper allergies in this house so I made her Tomato soup all on it's own, and combined it with her Soda Focaccia, and all I can say is it was the easiest,  tastiest lunch I have had in ages.  The sundried tomatoes in the soup really intensify the flavour - skrummy stuff.

*Dom and Jac - don't present a children's TV show!! They write two excellent blogs - really worth visiting if you haven't already done so.

Tomato Soup
from Catherine Fulvio

extra virgin olive oil
2 garlic cloves, sliced
2 sundried tomatoes, chopped
1 potato, peeled and chopped
1 x 400g tin chopped tomatoes
300ml vegetable stock
2 tsp chopped fresh basil
salt and pepper

Fry the garlic and sundried tomatoes in some olive oil for a minute.
Stir in the potato, tomatoes and stock and bring to the boil.
Reduce the heat and simmer for  10-15 minutes, until the potato is cooked through.
Add the basil and remove from the heat.
Puree the soup and taste for seasoning.
Add more stock if needed.

Serve and enjoy.

Saturday, November 26, 2011

TIME FOR A TEA TIME TREAT


There's a new challenge on the blogging block, and I love a good challenge, so I was delighted when two exceptional bloggers came together to invite us to tea .... well to Tea Time Treats, and this month Karen has invited us to prepare something delicious using ginger, happy days - my all time favourite ingredient (along with all my other favourite ingredients!!!), not so happy days - I am really trying to cut down on the goodies so I can really pig out in December!!!!

So now my challenge was to make something delicious containing ginger BUT also something that I wouldn't devour (yes, that is the state of my will power these days) ........... it had to be dried fruit, loved by all the family but not by me!!!

I turned to Lilly Higgins' Make Bake Love (it's just so pretty) and decided to play around with her Tea Brack recipe, obviously adding some ginger in there, but I also simplified it by using a luxury fruit mix rather than the individual fruits she suggested - it went down a treat, and was just the stop gap needed before the Christmas Pudding Season started (the consumption of Christmas puddings in this house is a story for another day!).


Tea Brack
adapted from Lilly Higgins' Make Bake Love

300ml           hot strong tea
360g             luxury fruit mix
100g             chopped stoned dried dates
1                   egg
225g             self raising flour
150g             brown sugar
3 tbsp           Cointreau or your favourite alcohol
1 1/2 tsp       mixed spice
1 tsp             ginger
2                   knobs of crystallised ginger

Preferably the day before, but for as long as possible -  soak the fruit in the tea.

Preheat oven to 180 C
Line a loaf tin with parchment paper or butter it.

Add the ginger, beaten egg, flour and sugar to the fruit and mix well.
Add the Cointreau and spices and mix again.
Spoon into the prepared tin and bake for 1 - 1 1/2 hours - until a skewer (or stick of dry spaghetti) comes out clean.
When perfect remove from the oven and allow to cool in the tin for 5 minutes.
Remove from tin and cool on a wire rack.

Enjoy

Thanks to Kate and Karen for this fun idea.


For my Irish readers - I was invited to this years Taste of Christmas, a huge improvement on last year's event, plenty of stalls, delicious food from some excellent restaurants, including the wonderful Bon Appetite (where I did the masterclass!!).  I went to the first of the Masterchef shows and although it had a few glitches, and a bit of nervousness it was quite good.  It would have been very good had the audience been given copies of the recipes being cooked and if Nick had lightened up on plugging his book and restaurant!!
Well worth a visit, to get you in the Christmas mood.

Wednesday, November 23, 2011

WITH APPLE OR WITHOUT??


It looks burned, doesn't it?  Actually it didn't taste burned .... maybe it is the dark chocolate - very, very dark chocolate!!

I was watching a re-run of Nigella's kitchen, and her Chocolate Chip Bread Pudding just called to me, then I thought that it would be a good idea to incorporate it with Chele's  ingredient  for this month's We Should Cocoa challenge.  Like many fellow bloggers, I had fretted as to how I could add apple to a chocolate recipe, but I thought that some apple through this pudding would be delicious.  Unfortunately Brownieville Boy #2 spotted me adding the apple, and wasn't too enthusiastic!  So I compromised and added apple to just half of the pudding - and I have to say that the non-apple half was just a fraction nicer.

The pudding was light and fluffy, and deliciously creamy (despite containing only 125ml of cream) I would recommend that you give it a try. 

Chocolate Chip Bread Pudding

250g    stale bread, cut into 3cm cubes
100g    chocolate chips, or chopped chocolate
3          eggs
40g      light brown sugar
30ml    dark rum
125ml  cream
500ml  full fat milk
4 tsp    demerara sugar
1          apple (optional)


butter a pie dish (about 1.5 lt)
preheat oven to 170 C

Place the bread cubes, chopped chocolate and chopped apple in the dish, toss but make sure there aren't too many chocolate pieces on the top (to prevent the burned look!!)
Whisk the eggs, light brown sugar, rum, cream and milk together.
Pour over the bread and press the cubes down to make sure they are well soaked.
Leave to soak for at least 20 minutes.
When ready to cook, sprinkle with the demerara sugar and place in the oven for 40-50 minutes.
Allow the pudding to cool slightly before serving.
Enjoy.

Friday, November 11, 2011

PAINT IT PURPLE


A number of years ago, a good friend told me that she had been the victim of domestic violence - she had suffered for years in silence, I think that the worst part for her was the isolation, being unable to talk about her experience.  I am so proud of her that she had the courage to leave the awful situation she was in, and was and am delighted to help in any way I possibly can (although truth be told since my sister's death she has been the one doing all the helping!).

The Pixel Project were in contact with me recently, I am delighted to be able to participate in their "Paint It Purple" Cupcake Online Recipe Gallery which is a campaign to to raise awareness and funds for the cause to end violence against women (VAW) in communities worldwide.  They do this work using social media and new technologies. We can help by baking and photographing a cupcake for their website and writing a bit about their wonderful work. 

Coincidentally I had recently baked Lavender Cupcakes from the wonderful "Red Velvet, Chocolate Heartache" by Harry Eastwood - talk about predestined!!  They were absolutely delicious, the lavender flavour was present but subtle (I had feared a soapy taste, nothing could be further from the reality).  The courgette on the other hand was completely unrecognisable!  The nicest possible way to get one of your "five a day"!!!

Lavender Cupcakes
adapted from Red Velvet, Chocolate Heartache


For the cupcakes

2            eggs
160g      lavender sugar
220g      grated peeled courgette
1 tsp      vanilla extract
100g      rice flour
120g      ground almonds
2 tsp      baking powder
1/4 tsp   salt

For the icing

140g      icing sugar sifted
3 tbsp    blueberry juice

Preheat oven to 180 C
Line a 12 hole muffin tray with papers

Using an electric whisk, beat the eggs and sugar until pale and frothy (this will take about 5 minutes)
Add the grated courgette and the vanilla extract and whisk again.
Fold in the flour, ground almonds, baking powder and salt, and combine.
Using an ice cream scoop divide the mixture evenly between the muffin cases.
Bake for 20 minutes, until risen and a skewer comes out clean.
Remove to a wire rack to cool.
Prepare the icing by adding the juice to the icing sugar - stir well to combine.
When the cupcakes are cold spread the icing over the top.
You can decorate with some lavender flowers if you have some available.

Enjoy.

Saturday, November 5, 2011

BROWNIES 20 AND A REVIEW.


I have mentioned Lilly Higgins new book Make Bake Love on a recent post and promised to do a review - over at her blog Stuff I Make, Bake, Love Lilly was saying that her book is sold out on Amazon, I'm not at all surprised!  It is an excellent book, packed full of doable (is that a word??) delicious recipes - with a few aspirational ones in there for good measure. I was absolutely delighted to recieve a review copy.  The photography is wonderful, you just want to reach in and grab a bite, there is an excellent balance of  unusual flavours (Plum and Cardamom Cupcakes -delicious!)  and old favourites.  The recipes seem to be well tested (I'm pretty sure I read that Lilly worked as an instructor at Ballymaloe Cookery School) and thought out. 

I think that you can often judge a baking book by it's bread section and having made most of the breads from this book (I left out a couple of the yeast ones!!) I have to say that it really stands up - the Health Loaf being a particular favourite here.  If I have any criticism of the book, and it is very slight, it is that there are a couple of recipes in there that are just variations of a previous recipe - the Blueberry muffins are very like the Red Berry and White Chocolate Muffins, but that really is nitpicking.  All in all, I loved this book (I really enjoy when fellow bloggers make the step over to writing cookery books successfully) and I can't wait for her next one!


I've been having a great time over the past couple of weeks baking up a storm trying out loads of the recipes, one has already become a firm family favourite and I've made it several times!

These are the Rum and Raisin Cupcakes - totally addictive!  I have a confession to make here - the deliciousness of these cupcakes might be helped by the fact that I used raisins that have been soaking in rum for 2 years - yes, you did read that correctly!!!  I bought a bottle of dark rum especially to make Rum Raisin ice cream, left the raisins to soak in the rum in a big jar, and promptly forgot all about them - for two years!  I recommend you do the same!

Even as a non-lover of dried fruit, I'm a huge fan of these cupcakes - I very generously give my raisins away (!) but the sponge retains the sweet, mellow flavour from the fruit.


Health Loaf - it's great to feel virtuous eating bread this delicious!


The Spiced Sultana Bread was a doddle to throw together, and scored really high on the taste to effort ratio!


I played around with Lilly's Honey Oat Bread, and used bicarbonate of soda as a raising agent instead of yeast (how lazy am I??).  Tasted great though!


I'm going to have to try the Seed Loaf again, as I don't think I did the recipe justice - the yeast thing is still my problem area!!!


I have blogged about the Blueberry (Blackberry) Muffins here. 


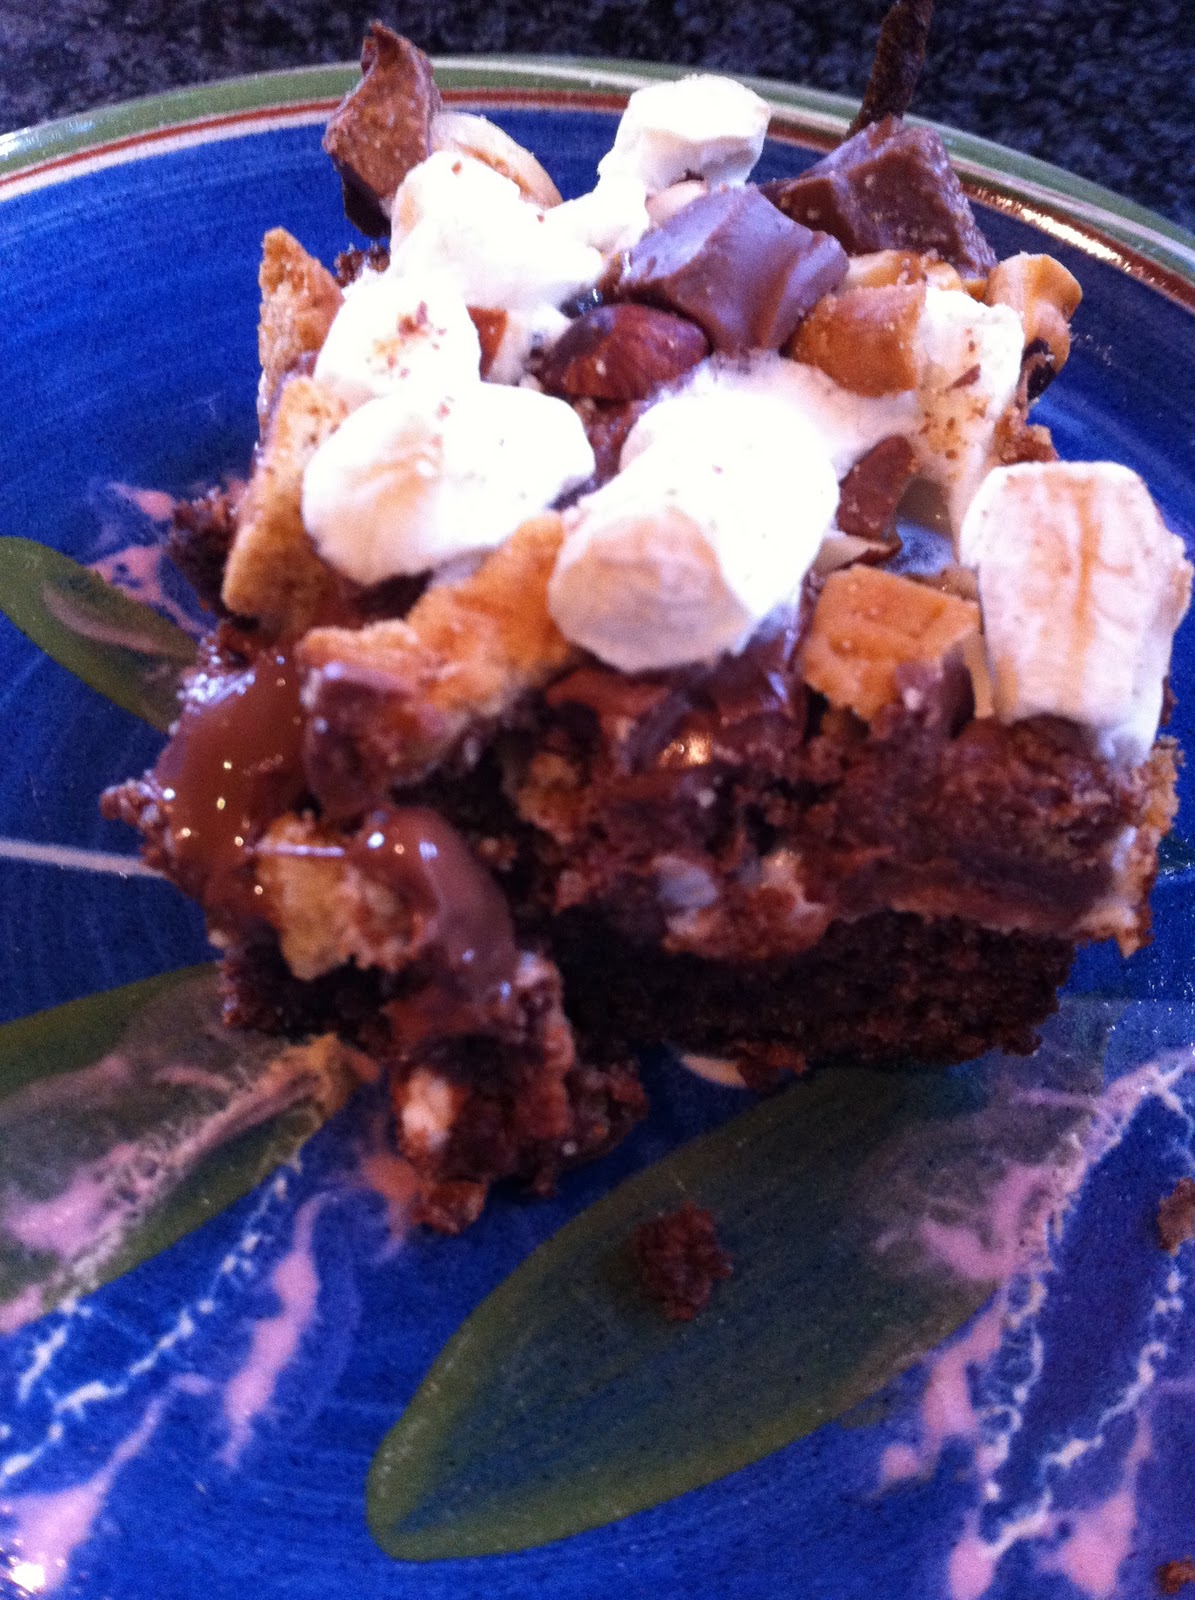
Rocky Road Brownies - oh my!!!  Scrumptious stuff!!


Plum and Cardamom Cupcakes had to be at the top of the "to try" list - I just love anything containing cardamom!  I tried making these as Lilly did with the plums just halved, but found them to have a better texture when I chopped up the fruit.


I added some chocolate chips to Lilly's Hazelnut Shortbread and they were devoured in no time!

From all the recipes I have tried I most want to share the Rocky Road Brownie one - I have been neglecting my brownie section of late, and these belong well up on the list!  Lilly says that you have to have both pink and white marshmallows in a Rocky Road - I beg to disagree!!!!!

Rocky Road Brownies
adapted from Lilly Higgins, Make Bake Love

For the Brownies

200g           dark chocolate (I used 50%)
250g           icing sugar, sieved*
200g           softened butter
3                 eggs
110g           plain flour

For the Topping

200g            chocolate, chopped - just use your favourite
100g            toasted nuts - I used hazelnuts and almonds
70g              digestive biscuits**, broken up
80g              marshmallows

Preheat oven to 170 C
Line a 23cm x 33cm baking pan with parchment paper.

For the Brownies

Melt the chocolate in a microwave or in a bowl over simmering water.
Beat the icing sugar and butter together until light and fluffy. (* I think that the icing sugar is too messy to work with - flies all over the place if you are not very careful, so I would use caster sugar in future)
Add the eggs one by one, mixing well between each addition.
Beat in the flour until just combined.
Slowly pour the melted chocolate into this mixture and combine well, without over mixing.
Pour into the prepared tin and bake for 30 minutes, but start checking at 20 - over cooked brownies are so disappointing!

For the Topping

Mix the nuts, biscuit rubble(**I used less than Lilly recommended) and marshmallows together, next time I'll add some broken up Maltesers or Chrunchie Bars to the mix.  Keep the chopped chocolate to one side.

When about 5 minutes away from being cooked, remove the brownies from the oven. 
Scatter the biscuit mixture over the brownies, and then scatter the chocolate over this.
Return the brownies to the oven for 3 - 5 minutes, until the chocolate has melted sligthly and melded into the topping ingredients.
Remove from the oven and allow to cool in the tin on a wire rack for 20 minutes.
Best enjoyed while still slightly warm.....mmmmmmm!


Pop over to The Sporadic Cook, Julie's wonderful blog - you might find it interesting!

Thursday, November 3, 2011

MASTERCLASS WITH A MASTER


This year I recieved one of the best and most thoughtful birthday gifts ever from my boys - I have to admit that I might not be the easiest person in the world to buy for!  But this year they excelled themselves - they bought me four masterclasses in Bon Appetit Restaurant with the talented Michelin starred chef Oliver Dunne.   The first of these was titled "Dinner Party Dazzlers", and it was a fantastic evening - full of doable tips and ideas, Oliver's main aim was to teach us that entertaining at home need not be stressful - just about everything can be prepared in advance, he didn't want us slaving away in the kitchen while our guests were enjoying drinks without us!!!

Probably the best part of the evening were the tips and the foodie gossip - I don't think he could be described as his ex-boss Gordon Ramsey's biggest fan!!!!! 

A few of the pointers:

For really excellent balsamic vinegar without the huge price - buy a cheap bottle, reduce it by 3/4 in a large saucepan, and you have deep, sweet, delicious stuff, which makes a perfect dressing combined with olive oil, dijon mustard and salt.  The reduced balsamic vinegar is great for presentation, a few dots on a plate really dresses it up.

Always cut chicken to check if it is done - pressing it will never give a difinitive answer and you are far better off having a little nick in the bird than having poisoned guests!!

Always have your pan good and hot before you add butter/oil.

When melting butter, chop it into small cubes - otherwise the outside will have burned before the center is melted.

Speaking of butter - use about four times more than you usually do to have proper restaurant tasting food!

Use icing sugar when making chantilli cream - much better texture.

Oliver seasons with salt at every step - he said that he rarely uses pepper.


Roasted Quail with Chorizo, Red Onion and Balsamic Dressing


Warm Goats Cheese and Caramelised Shallot Tart


Breast of Chicken, Tart Fine of Onions and Creamed Wild Mushrooms


Smoked Haddock, New Potato, Soft Poached Egg & Mustard Beurre Blanc


Apple Tart Fine with Chantilly Cream & Butterscotch

Hot Chocolate Fondant with Vanilla Cream


The kitchen prepared samples of most of the dishes Oliver showed us and they tasted just as good as they look!!  I'm really looking forward to the next lesson.

Tuesday, November 1, 2011

FANTASTICLY FIZZY


Hope you all had a fantastic Halloween, and that there aren't too many sugar hangovers out there!!!   I have to admit to an addiction to sugary, fizzy children's sweeties - so you can imagine that I just love this time of year :-)

You can imagine with this addiction of mine (!) that I was delighted when Swizzels Matlow contacted me about a new range of sweets they are introducing to the market - the highlight being (for me anyway) some Scooby Doo (like Love Heart sherbet ) sweets - yahoo!!  The kids (Brownieville Boy #4 and the Princess) were beside themselves when a box filled with these fizzy sweets, Scooby Doo jellys and some fizzy chewy bars as well as a really cute Scooby Doo toy arrived in the post.  They were so anxious to dive in that they took the photos for the blog themselves!!


I managed to save the packet of jellys and used them to decorate this year's Halloween Treat - we live in the country so unfortunately don't have any trick or treaters - but this lime traybake went down well with all the family, some of whom nabbed the jellys from other people's slices when they weren't looking!!!  The sponge was lovely and light but with that gorgeous lime tang combined with the buttery softness - and then the sweet/sour topping made the perfect combination.

The recipe is from Mary Berry and you can find  it over at Baking Mad a site full of cake recipes that I'm really enjoying at the moment.  The only change I made was to add 1/2 tsp of lime essence to the batter.  I used a 8"x8" brownie tin but actually think a bigger tin would be better, for a flatter sponge and therefore a higher sponge to glaze ratio - I just love a lime glaze, almost reminds me of sherbets (yummm!).

Sunday, October 30, 2011

HAGGIS?? REALLY?? HAGGIS??


This month's Random Recipe Challenge was "I'll show you mine, if you show me yours", whereby Dom paired us up and another blogger gets to choose the recipe we'll cook (have a look at Dom's instructions, it's too difficult to explain!!!).

I was incredibly lucky to be allocated Lou, from Please Do Not Feed the Animals, a seriously wonderful blog.  Lou is the sort of person that I think I shouldn't like (she has a highly satisfying career, is an outstanding baker, has a husband who cooks up a storm, her kids could grace any add campaign, they are beyond gorgeous) but jealousy aside, she is a pure pet!  On top of all those wonderful attributes Lou is also Physic - well how else do you explain a woman from Scotland choosing what I'm sure is the only haggis recipe in my whole collection - yes you read correctly - Haggis!!!!!

Lou did offer to post me over some haggis (see what I mean, such a nice person) but I thought I'd seen some in M&S and reckoned I'd have no problem - ha, it's impossible to source haggis in Ireland.  I decided to go ahead with the recipe anyway and  I reckoned that black pudding would make a good substitute (with deepest apologies to all the haggis fans out there!!), so I went ahead and cooked "Haggis, potato, bacon and apple fry-up" without the haggis.

I should have mentioned before now that my chosen book was The Really Helpful Cookbook by Ruth Watson, this is actually an excellent book - but this recipe is obviously a filler - I'd guess that she made a dinner from left-overs the night before she submitted the book and had to throw an extra recipe in there, and in it went!  If some evening you have some left over haggis (or black pudding) and potatoes in the fridge, with some bacon in there too and some apples in the fruit bowl - you could try this, otherwise I wouldn't bother.

There is no point in giving you the recipe - you just fry up some onions, garlic, potatoes (black pudding if using) in some olive oil and add some crisp apple for the last two minutes - serve with some haggis (if you have some) - easy as that. 

Wednesday, October 26, 2011

I'M SUCH A WUSS!!!


I have been looking forward to this month's We Should Cocoa challenge - each month I have willed Choclette or Chele to nominate chilli as the companion in our monthly chocolate challenge, and it's come - and what did I do?  I chickened out - and just used Lindt Chilli Chocolate. I didn't risk chopping up some hot, hot, hot chilli and mixing it in there - I'm such a wuss!!!!

That said these mini chocolate pots, from Catherine Fulvio's wonderful book Catherine's Family Kitchen were delicious - I used chilli chocolate instead of the plain and omitted the Baileys Irish Cream (something told me that chilli and Baileys might not be the best combination possible!!!!)  The chilli chocolate gave a very slight kick to the back of your mouth - subtle and simply yummy.


Mini Chocolate Pots
adapted from Catherine Fulvio's Family Kitchen

100g        chilli chocolate
50g          butter
1              egg
1              egg yolk
2 tbsp       caster sugar
1 tbsp       ground almonds

Preheat oven to 180 C
Butter 4  or 5 espresso cups

Melt the chocolate and butter in a bowl over simmering water
In another bowl whisk the eggs and sugar until light and fluffy
Fold the chocolate mixture into the egg mixture
Add in the almonds
Pour the mixture into the prepared cups (up to 3/4 level) and pop into the oven
Bake for 15 to 20 minutes - they still need to be gooey in the middle.
Serve - but be careful not to burn your tongue!!


Friday, October 21, 2011

A GOOD MORNING!


Over at the delicious What Kate Baked, Kate has challenged us to bake something tasty for her Autumnal Baking Challenge - and the fruit that screams Autumn to me are blackberries, those delicious fruits that shout "pick me, pick me" as I try to maintain some pace on my  (occasional) morning walks - I'm ashamed to tell you how many times I give up on the idea of exercise and sucumb to the call of the purple orb (actually to the call of the tart/crumble/jam that will be their final destination!!).

I came home this morning with the last of the blackberries (only a few shrivelled specimens left on the bushes now) and found Lilly Higgins' new book Make Bake Love waiting for me - I have been following Lilly's blog Stuff I Make Bake Love for ages (do take a look, you'll love it) - and what could I do but combine the morning's haul and make something from the book using my precious berries.

There are many delicious recipes to choose from (I'll do a review soon - no problem finding recipes everyone will love!) but I alighted on her Blueberry Muffins - and even if I say it myself (!) it was a great decision - the muffins are light in texture but are brim full of flavour, and the blackberries were a fantastic replacement for the blueberries.


Blackberry Muffins

225g       plain flour
1 tbsp     baking powder
75g         Demerara Sugar (I used more as the blackberries were quite sharp)
1             large egg
150ml     milk
40ml       sunflower oil
1 tsp       vanilla extract
150g       blackberries

Preheat oven to 190 C
Fill a muffin tin with 12 paper cases (I actually got 11 good sized muffins from the mix)

Sieve the flour and baking powder into a large bowl.
Pour the milk, oil, vanilla extract into a jug, add the egg and whisk.
Pour this mixture into the flour and mix gently, remember lumps are good!
Gently fold in the blackberries.
Divide the mixture between the paper cases and pop into the preheated oven.
Bake for 15 - 20 minutes until golden and risen, and a skewer comes out clean.
Remove the muffins from the tin and allow to cool on a wire rack.


Thursday, October 20, 2011

APPLEY, SPICEY, YUMMY!


The Cake Slice Bakers have a new book, it is The Cake Book by Tish Boyle, and it is wonderful - I can't wait to get my teeth into it (literally!), some really interesting recipes in there, along with  new versions of old favourites.

This month's recipe is perfectly seasonal, and offered the ideal recipe to use up the last of the apples from my mother's trees - they went to a good home, this cake is delicious, brim full of spices.  I'm not the biggest fan of cooked apple, when you can have crisp, crunchy and fresh apple why would you choose to have soft, sweet and tangy apple - that's not making a great argument is it? 

I had to abandon the recommended Cream Cheese Maple Frosting when my cream cheese didn't pass muster - I went back to the drawing board and just added some maple syrup to some sieved icing sugar - it matched perfectly.


Apple Cake with Maple Frosting

1 1/2 cups (181g)     plain flour
1 tsp                         baking powder
1 tsp                         ground cinnamon
1/4 tsp                      ground ginger
1/4 tsp                      ground cloves
1/4 tsp                      bread (bicarbonate of) soda
1/4 tsp                      salt
1/2 cup (113g)          softened butter
1 cup (217g)             light brown sugar
1 tsp                         vanilla extract
2                               large eggs
2/3 cup (160ml)        buttermilk
2 cups (120g)            peeled and chopped (1/2 inch pieces) Granny Smith apple (about 2 apples)
1/2 cup  (57g)           coarsely chopped walnuts

Preheat oven to 180 C (350 F)
Grease bottom and sides of a 9" square baking tin, and dust with flour.

Whisk the flour, baking powder, cannamon, cloves, ginger, bread soda and salt together in a medium bowl - set aside.
Using the paddle attachment of an electric mixer beat the butter at a medium speed until creamy.
Gradually add the sugar and beat until light and creamy.
Add the vanilla extract and then the eggs one at a time, beating well after each addition - remembering to scrape down the sides of the mixing bowl as needed.
Reduce the mixer speed to low and add the flour mixture in three additions - mix well until blended.
Stir in the apples and nuts and combine by hand.
Scrape the batter into the prepared pan and smooth the top.
Bake for  25 - 30 minutes until golden and a skewer comes out clean.
Cool the cake completely in the tin on a wire rack.

Enjoy.


Tuesday, October 18, 2011

EUREKA!


Eureka! I've found it, I've found the perfect chocolate cake recipe!  It's delicious, it's impressive and it's way, way less work than it looks, and did I mention it's delicious?

Two layers of chocolate sponge, two layers of creamy white chocolate and a layer of creamy dark chocolate topped by a thick layer of milk chocolate ganache - heaven in a slice.

The cake itself is just a normal chocolate sponge which you slice in two (easier than baking two seperate sponges), next drizzle over some syrup and then you melt white chocolate in one bowl, dark chocolate in another - add cream to both, slap them on cover with a simple ganache - bish bash bosh - cake perfection!


Triple-Layer Chocolate Truffle Cake
from the wonderful Avoca Cafe Cookbook 2

Sponge

4             small eggs (I used 3 large)
100g       caster sugar
75g         self-raising flour
25g         cocoa

Syrup

75ml        milk
20ml        brandy
20ml        honey

Chocolate Layers

225g         white chocolate
300ml        double cream

110g          dark chocolate
300ml        double cream

Ganache
75ml         cream
350g         milk chocolate

Preheat oven to 180 C
Butter and line a 23cm springform cake tin

Sponge
Whisk the eggs and sugar together until thick and pale
Sieve the flour and cocoa and fold into the egg mixture.
Pour into the prepared tin and bake for 20-25 minutes or until a skewer comes out clean.
Remove from the oven and allow to cool on a wire rack.


Syrup

Put the milk, brandy and honey in a small pan and heat gently.


Assembly (first step)

When the sponge has cooled, remove it from the tin.
Line the tin with cling film (use plenty)
Cut the sponge in two across its depth
Place half the cake back in the lined tin and brush with the syrup


Filling

Melt the white chocolate with 50ml of cream in a pan over simmering water.
In another bowl melt the dark chocolate with 50ml of cream.
Allow to cool slightly.
Whip 250ml double cream and add the melted white chocolate mixture.
Whip the other 250ml cream and add the dark chocolate.


Assembly (part two!)

Spread half the white chocolate on the sponge in the tin.
Follow with the dark chocolate mixture.
Finish with the other half of the white chocolate mixture.
Brush the other half of the sponge with the syrup and place on top.
Cover the cake with the cling film and place in the fridge to set overnight.


To Finish

Combine the milk chocolate and cream and heat gently to melt the chocolate.
Remove the cake from the tin and spread the chocolate ganache over the top and sides.


Sit back and wait for the praise!

Saturday, October 1, 2011

A RANDOM BAKE!


The P.R. fairies must know that I need some cheering up, as I recieved a number of exciting packages over that past few weeks - Catherine Fulvio's new book (loving it so far), some yummy Skooby Dooby Doo sweeties (had to fight the kids to get near them!!) and a beautiful baking kit from Avon.

The "Avon Breast Cancer Crusade Baking Set", is part of Avon's fund raising for Breast Cancer charities, it is such a fun way to gather money for a cause that is very dear to my heart, that I am really pleased to encourage you all to participate.  The pretty kits are available from Avon representatives or online here.  The reason I am so enthusiastic about this crusade is that so many people we know recieve the dreaded diagnosis of cancer, yet so many of them come through to lead full and happy lives - how can we resist putting our hands in our pockets for such a worthy cause.  My mother has had two battles with breast cancer, and while it was not an easy time, it is just a memory now - and how much better is it to have memories of a cancer battle rather than memories of a loved one?

When I gathered all of my magazine cuttings and scribbled recipes in order to choose this months Belleau Kitchen Random Recipe Challenge I was feeling all enthusiastic - for once I was guarenteed a recipe that I'd just love - I wouldn't have cut out the recipes otherwise - right?????  Well actually I had forgotten that mid diet I often cut out recipes that promise fantastic flavours with hardly any fat/sugar, but which usually are all promise and no delivery!  Well, of course it was one of these pages that emerged from my stash - but as you know I am an honest person (!) so that is what I baked.  And I have to say "Thanks Dom" because there is no way I would have baked these little cupcakes other than because I was challenged to do so, and they are lovely - moist texture and tasty (although next time I'll add extra cocoa powder).


The light cupcakes were the perfect opportunity to use the sweet little silicone cupcake holders which come in the Avon kit (along with a pink ribbon and a heart shaped cookie cutter), and then it occured to me that I could send off a half batch of the cakes to my friends sister, who is currently undergoing chemo for breast cancer.  How perfectly whole and fitting is that?  I know that when Mum was going through her treatment she found it very difficult to be enthusiastic about food, but sometimes a little something sweet would be enough to get her through - so I hope that the cupcakes I sent over were of some small help.  Vanessa over at Prepped (she has just published a cook book - it's at the top of my wish list, looks fantastic) has decided to continue with her wonderful, heartwarming challenge Random Bakes of Kindness and these little confections are my offering - I hope it's not too cheeky to submit one lot of baking to two challenges!!!!


If you are watching the scales, I would recommend these cupcakes - they aren't huge, but they are full of flavour and I think one (or maybe two!) would be enough to keep you on the straight and narrow! 

Raspberry and Chocolate Cupcakes
from a Slimming World recipe

2              eggs
6 tbsp       caster sugar
1oz/28g    low fat margarine* (I used LowLow)
2oz/57g    self raising flour - sifted
1.5 tbsp    cocoa powder - sifted
1 tsp         vanilla extract
32            fresh raspberries **

Preheat oven to 180 C
Prepare 8 cupcake cases

Whisk the eggs, sugar and margarine* until pale and creamy.
Add the vanilla extract.
Fold in the flour and cocoa powder gently.
Place 3 raspberries** in the base of each paper/silicone cupcake holder.
Divide the cake mixture over the raspberries.
Bake 15-20 minutes until firm and springy to the touch.
Remove from the oven and allow to cool on a wire rack.
Enjoy!!

* This is the first time that I've used margarine in baking and it was fine - if you don't have any in the house I'm sure butter would work just as well and at only 28g it couldn't do too much harm to the diet!!

** I used frozen raspberries and while the cupcakes were delicious I think they would be even better had I used fresh.